Home > Using CampControl > Freight Control > Send Freight > Freight Control Sheet
Freight Control Sheet
View this page in Español, Français, Português, Русский or another language.
A Freight Control Sheet (FCS) is similar to a waybill (definition in box below), although it is created by the shipper, who may, or may not be the carrier.
The Freight Control Sheet screen is used to enter all the details needed to ship items under cover of an FCS, and also for displaying and editing details already entered into an FCS. A detailed explanation of the purpose of each field on the screen appears on the FCS Detailed Explanation page.

Definition of Waybill: " A receipt given by the carrier to the shipper acknowledging receipt of the goods being shipped and specifying the terms of delivery". From: http://www.onelook.com/
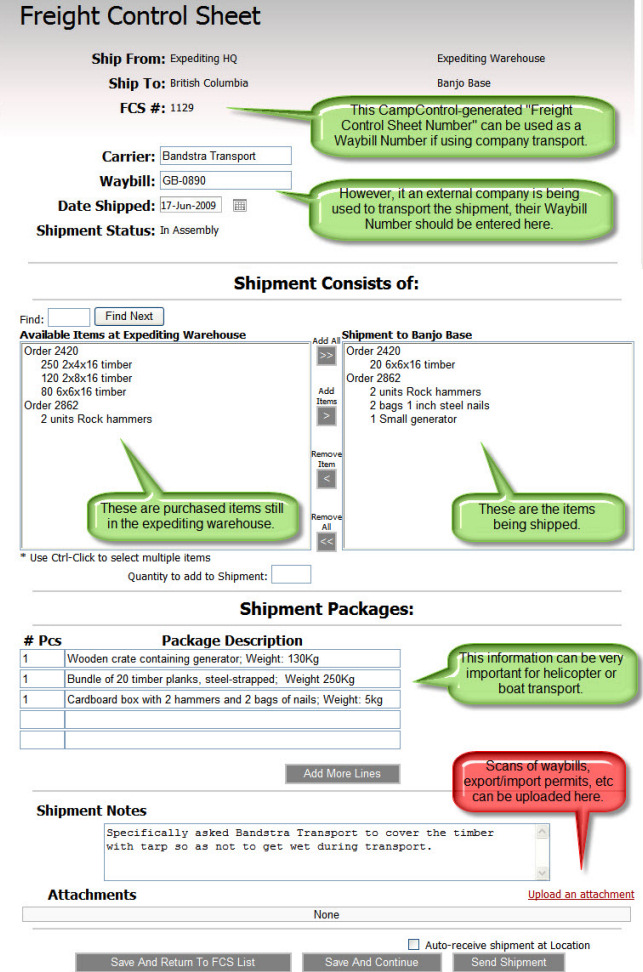
If the Shipment Status is “In Assembly”, you can edit the FCS. To add items to the FCS, you move Available items (on the left) to Shipment (on the right). Available items are items listed in the Location Inventory of the “Ship from” Location, which appears at the top of the page, and has to be selected when first creating the FCS.
The Expediting Warehouse is a special Location. Items that are bought through the Order process are placed in the Expediting Warehouse for shipping.
You can also add items, such as miscellaneous items that need to be sent to a camp, directly to the Warehouse for shipment in the future – see Warehouse Control.
There are a number of ways to move items into a shipment:
- To add one item line, click on an Available Item and click the “Add Items” button.
- To add part of the quantity of items available (e.g.: 3 of 5 bags of nails), click on the Available item, edit the “Quantity to add to Shipment” number below the "Available Items" window, and click the “Add Items” button. Note that this can be done only one line-item at a time.
- To add all items, click the “Add All” button.
- To add a whole order (only when shipping from the Expediting Warehouse), click on the Order line (e.g. “Order 1202”). Note that the Order line has the Order items listed below it. Click the “Add Items” button. All items in the order will be added to the shipment.
- To add multiple items (and/or Orders) in one step, press the Ctrl key on the keyboard and click on each of the Available Items that you want to add. Note that holding the Ctrl key indicates to the browser that you’re selecting multiple items. Once all the required items are selected, click the “Add Items” button.
Click on the “Save and Return to FCS List” button to save your changes (in draft form) and return to the previous page.
Click on the “Save And Continue” button to save your changes and continue editing the FCS
Check the “Auto-receive shipment at Location” option, if you want to skip the Receive Freight step. This is useful when re-organising inventory and a formal "receive" event does not need to be monitored, or when you are personally for transporting items from one Location to another. It is not advisable to use this option when physically shipping to a Location as it may be disputed that the goods were received at the destination.
Click on the “Send Shipment” button to send the shipment. This places the FCS in the “In Transit” status (or “Received” status if Auto-receive is used).
Once the Shipment Status is “In Transit”, you can no longer edit the FCS. However, you can move the FCS back into “In Assembly” status by clicking the “Reopen Shipment” button. This is useful when, for example, an FCS has been completed, the vehicle is about to leave with all its shipped items, and a "last minute" item arrives that needs to shipped with the departing vehicle.
Click on “Print this FCS” or “Email this FCS” to print or email the FCS.
Click on “Create Shipping Labels” to create shipping labels.

You need the following permissions (see Manage Permissions):
To view this screen: "Update Freight Control"
See also